Also in mind: the luggage situation...
It had to be a dress without any big understructures to fit in a suitcase along with all the other costumes.
It had to be something I would feel comfortable in a big crowd (no train!).
It had to be rather lightweight.
In the past I gradually developed my skills towards historical accuracy and this dress should finally proof, that I can sew accurate (when I want to)!
When I decided on my Gala Dress back in April it became obvious pretty quickly, that I was up for a real challenge!
1830s!!!
And not just a bit, but with those freaking awesome structured sleeves that look like a piece of delicately folded paper!
 |
| Petit courir des Dames 1834 |
I spend a few days searching the internet for originals of this kind of sleeve and also for successful recreations. While there are quite a few fashion plates and portraits showing those sleeves I only found this "real life" example from the LACMA museum:
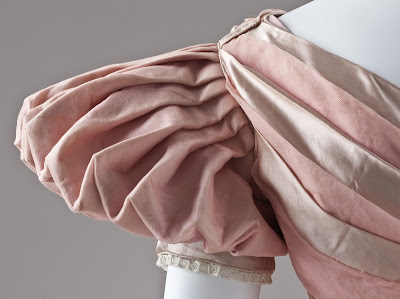 | ||
| This picture proofs it can be done! |
 |
| LACMA M.2007.211.940a-b |
| TV 455 |
It is on the cover, but the sleeve is not included in the pattern!
Frankly spoken: this was the first time I was a bit annoyed with a TV pattern... I started my mock up and when the sleeves came, they were no more than a simple puff. Needless to describe my disappointment here.
 |
| This is the TV sleeve pattern, attempted to fold it gracefully... Er, no! |
But also: No wonder I didn't find any made up versions of these sleeves, even though this pattern has been out for a while.
Now, dearest reader: since I failed to find much useful construction notes or patterns or help other that ONE original and a few fashion plates, I decided to try this on my own. This is the reason why this post will, without doubt, be the longest one in this blogs history!
If you don't like 1830s madness this is your chance to go back to my previous post and just read about my Costume copllege experience.
You are curious about my Gala Dress and especially my crazy sleeve journey? Keep reading and expect to be busy for a while...
If you are wondering why I am including a million photos in this post please know, that I am beeing totally selfish here! This is what I would have loved to have somewhere on the blogosphere as preparation for my own sewing journey, so I reckon some of you treasured readers appreciate the depth of this post.
This is my full dress diary featuring:
1. Underpinnings
2. Petticoats
3. The Dress and, of course, the sleeves in every detail
4. Accessoires
5. Hair
So, before even starting on the dress I needed the proper underwear. I finished my corded stays earlier this year, but the cut is more late 1820s and honestly: I wasn't too keen on the busk. The transformation stays - corset is set somewhere in the 1830s so I figured I'll just make a corset with a (unaccurate at that time) split busk for dressing convenience. My other intention was to use this corset for some of my other coco wardrobe as well to prevent my luggage from exploding.
 |
| The Met C.I.38.23.10b–d |
What I found to be most interesting is the fact that this corset has eyelets set for spiral lacing! This is something I have never seen on a corset with gores and gussets.
| Hop over to the MET for more pictures! |
Other interesting features:
- The centre back boning does not prolong to the very top edge, but continues as cording!
- Flossing through the boning!
- A centre front hook to keep the waisline free from bulk
- A mixture of cording and boning
- Metal eyelets (thank god!)
A few construction pictures:
 |
| my pattern pieces |
 |
| Drilling holes into the boning for the flossing |
 |
| Flossing through the german plastic boning |


 |
| I actually never finished the flossing completely. That is why the pink basting is still on. One day... |


I made this corset from ivory coloured silk taffeta interlined and lined with one of grandmas old cotton tabelcloth. It is machine sewn and boned with artificial german plastic whalebone.
The spiral lacing made it a bit akward to fasten for a corset, but it is really comfortable.
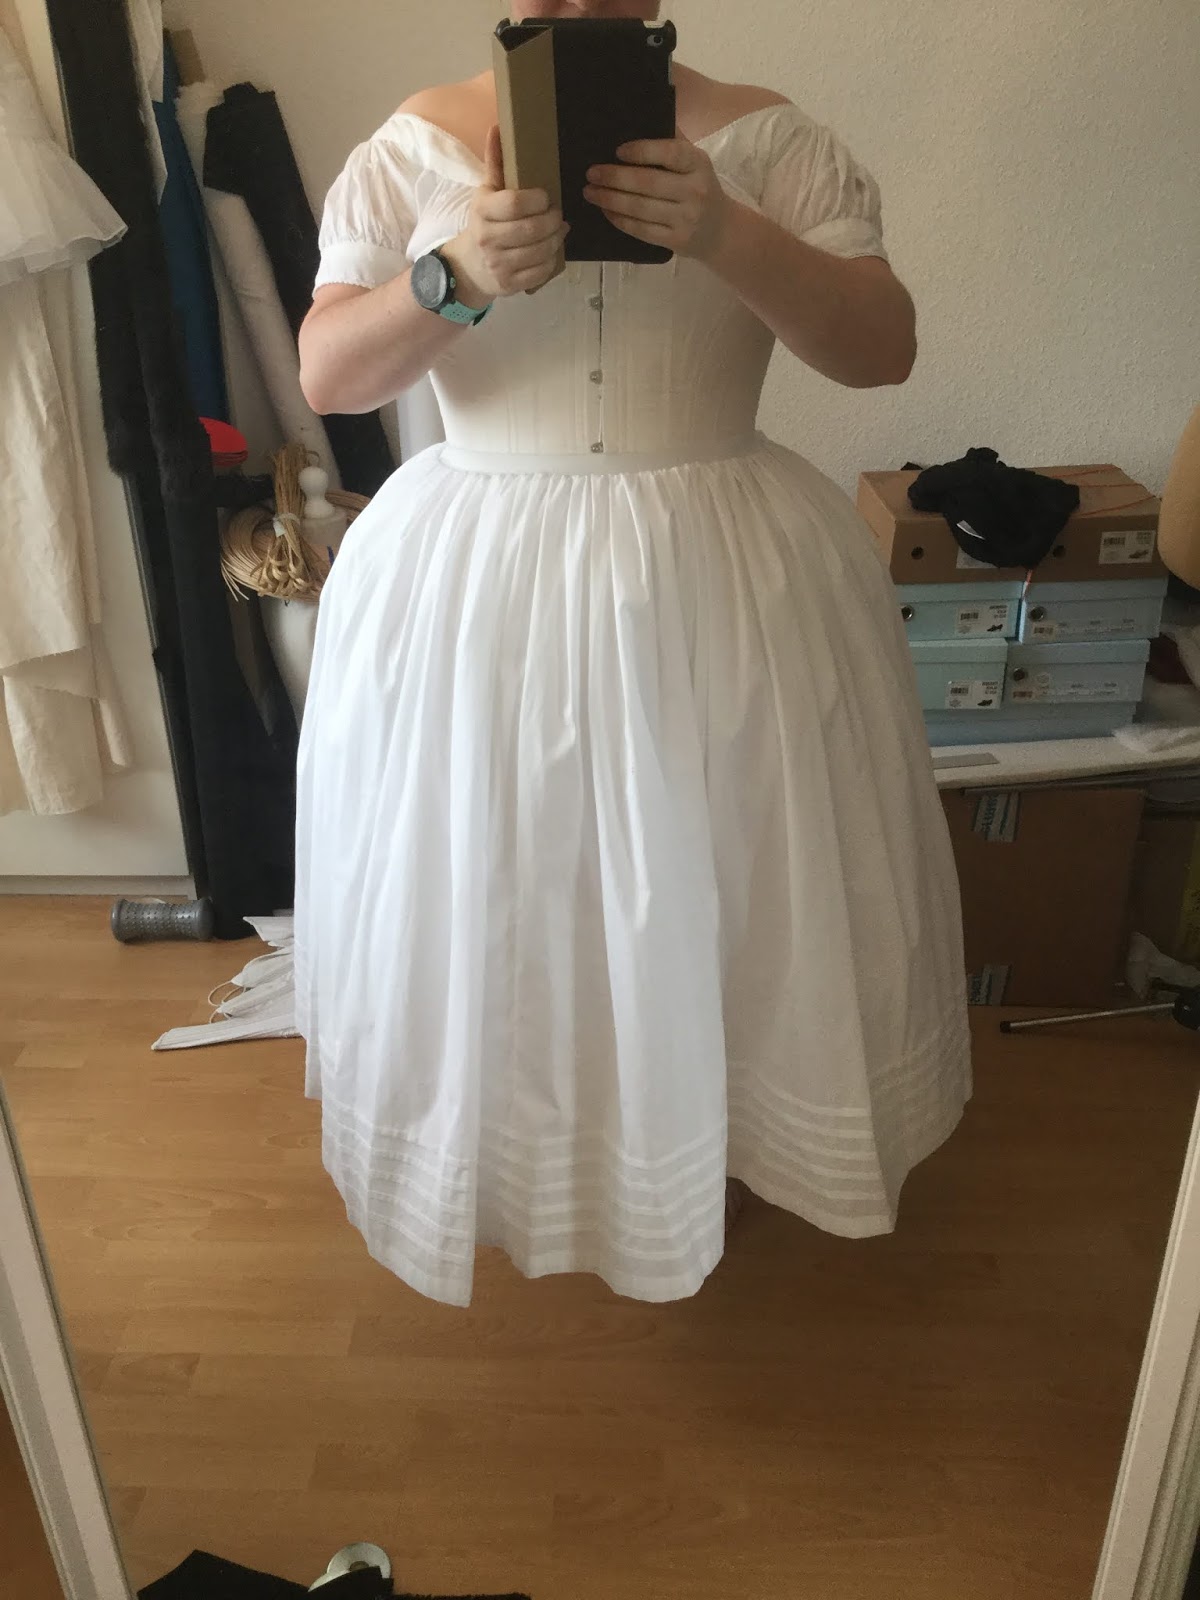
Then I made a small hoop for extra oomph and three petticoats.
I thought about making a down or wool filled bustle pad, but then I came upon this small hoop apparently from the 1830s!? I gave it a try anyway and it worked wonders! It gives a perfect shape in combination with all the petticoats!
 |
| Sorry, blurry picture and I cannot link it... |
The hoop,
A corded cotton organdy petticoat with both sandwiched and single layer cording, 92" around the hem.
A tucked cotton organdy petticoat, 160" around the hem.
A tucked cotton batiste petticoat, 160" around the hem.
 |


I know you're probably all here for the sleeves, but let's just talk about the corded petticoat for a small while, ok?
I corded with the same cotton yarn I used for my corded stays and, as mentioned, used both of the most common cording techniques: sandwiching at the bottom and single layer cording at the top. If you take a look at the following picture you'll notice a dark line in the middle. I started with a too small piece of fabric and had to add more to make the petticoat long enough...
Then I kept cording until it was too long! (I know, I know; who makes 30 rows of cording too much by accident???)
This led to the dark part at the bottom: originally three rows of sandwiched cording (each 30 rows) then turned out to be just two. I folded the bottom row underneath which actually helped the structure A LOT!
After starching and pressing this petticoat had the perfect stiffness and shape! Especially the stiffness at the hem was just what I wanted.
 |
| A few mistakes made on the way... |
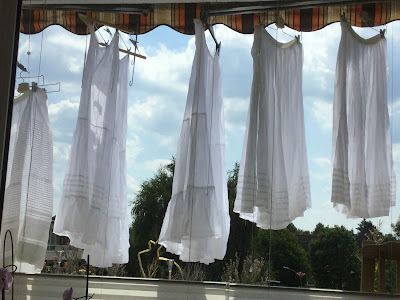 |
| Starching |
 | ||||
| After startching |
 |
| All petticoats done - Time for the dress! |
You made it through this far!
Time for the dress!
As mentioned earlier I wasn't too happy with the Truly Victorian pattern, but that was mainly because of the wrong sleeve pattern. I still used the pattern for the bodice and skirt.
 |
| My little helpers! |
First I made a bodice mock-up and adjusted the bust line to my taste. Then I just went along sewing the bodice. This dress is only my second all handsewn dress and I can't express enough how proud it made me after every single seam finished!
A few construction photos:
 | |
| I wasn't smart enough to cut the pleating from single strips to meet at CF... |
 |
| Piped shoulder trimming |
 |
| I actually found piping by hand much easier, compared to machine! |
 |
| Centre Front |
 |
| I broke a few needles on the way... |
 | ||
| Centre Back closure test piece |
The closure was the first real construction challenge for me, because apparently I misread the instructions...
I usually cut with very generous seam allowances when sewing into the unknown, but it just wasn't enough.
It took a bit off fiddeling, piecing, and ripping already finished seams for me to be happy with the closure...
Jen's write-up on closures helped in this department as well...
Maybe I was a bit overly critical, but I just didn't want the hook and eyelet stitches to be visible from the outside.
 | |
| The only visible stitching on the dress... |
 |
| Pieced back placket |


OK, so with the bodice all finished I could no longer procrastinate the sleeves.
The sleeves! They scared me!
I mentioned my research earlier and of course I came by Christinas attempt of the same sleeves a couple of years ago. I read her post over and over again to figure out how she did it and to learn from her challenges.
She wrote that they lost their shape when moving and were not full enough...
So I knew I would need a strong understructure and lots of fabric. Lets go!
First I folded some paper. For a week. It was very frustrating. I started with a rectangle and just eyeballed the size of the folds roughly to get started.
 |
| The first paper attempt |


it soon became clear that a rectangle would not work out for the sleeve, so I cut down the edges for a more "sleeve-like" pattern...
 |
| Slowly getting there... |
 |
| The very first prototype! |


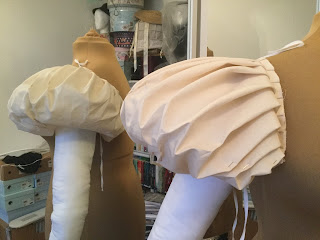
The muslin prototype. Still pretty obvious that this could not be the final shape, since my sleeves were supposed to sit off the shoulder and not on top. This was maybe the only time I actually used my down filled sleeve puffs made specifically for this dress. Oh, well...
More fiddeling...
 |
| NO! Not enough fabric. Also: where are the pleats? |
 |
| A bit better. |
 |
| I guess it could work... |
 |
| Hello Sleeve!! |
 |
| *almost crying with joy* |
 |
| OMG! This is really happening!!! |
I trimmed off all nasty edges and finally got my pattern!
 |
| My Masterpiece!!! |
At this stage I felt the worst part was over. It took me roughly two weeks to get to this point. Starting out from a rectangle originally, this looked so much more like a sleeve - just a little longer.
Since my mock-up had already shown signs of weakness I started to look for lining options and found the most valuable picture of this quest! It is blurry, but do you see what I see?
It is the same LACMA dress!
It is an inside view of the sleeves!
The coarse lining is visible!
Little tie strings to fix the shape!
The exact amount of pleats clearly visible!
Research heaven!!!

 |
| Apparently the original folds flat for storage! Must try this with mine sometime soon! |
My final fabric choice were three layers: first my silk taffeta, second cotton muslin as interlining and third a single layer of soft buckram my fabric store labelled as "embroidery linen" as lining. This combination should be supportive enough.
 |
| Let's do this! |
 |
| Bit by bit |
 |
| The zig-zag lines indicate my folding marks. |
 |
| Although they did not work out all the time. |

Nearly there...

 |
| Oh! My! God! |
 | ||||
| *crying with relief* |
This was a huge milestone not just for this dress, but for myself as well and I am crying as I write this. It is soo overwhelming and a real comfort to know I can accomplish a challenge such as this one!
Next step: covering the buckram base.

 |
| Feet for comparison |
At this stage I would like to mention that while it was smart to cut the buckram with all the points and edges, it was stupid to do so on the fashion fabric. Since the silk is formed around the base, it needs a bit more fabric and the lines are not matching those of the foundation.
 |
| I started on the top side of the sleeve, filling every buckram fold with silk- |


 |
| Isn't this just beautiful? |
But it endet up with a bit of sleeve silliness :-)

 |
| Perfectly adequate as tiara, if you ask me! |
 |
| The mismatched fashion fabric clearly vivible. But only on the inside! |


 |
| Be prepared to loose like 200 pins to this project... |


 |
| Backstitching my way around... |

First sleeve attached!!!
 |
| Yay! |

 |
| I checked both inside and outside for *every* stitch to make sure the piping fitted perfectly. |


 |
| Random inside view. |
 | |
| Finishing the sleeves with more piping | |
 |
| The finished sleeve - inside view |
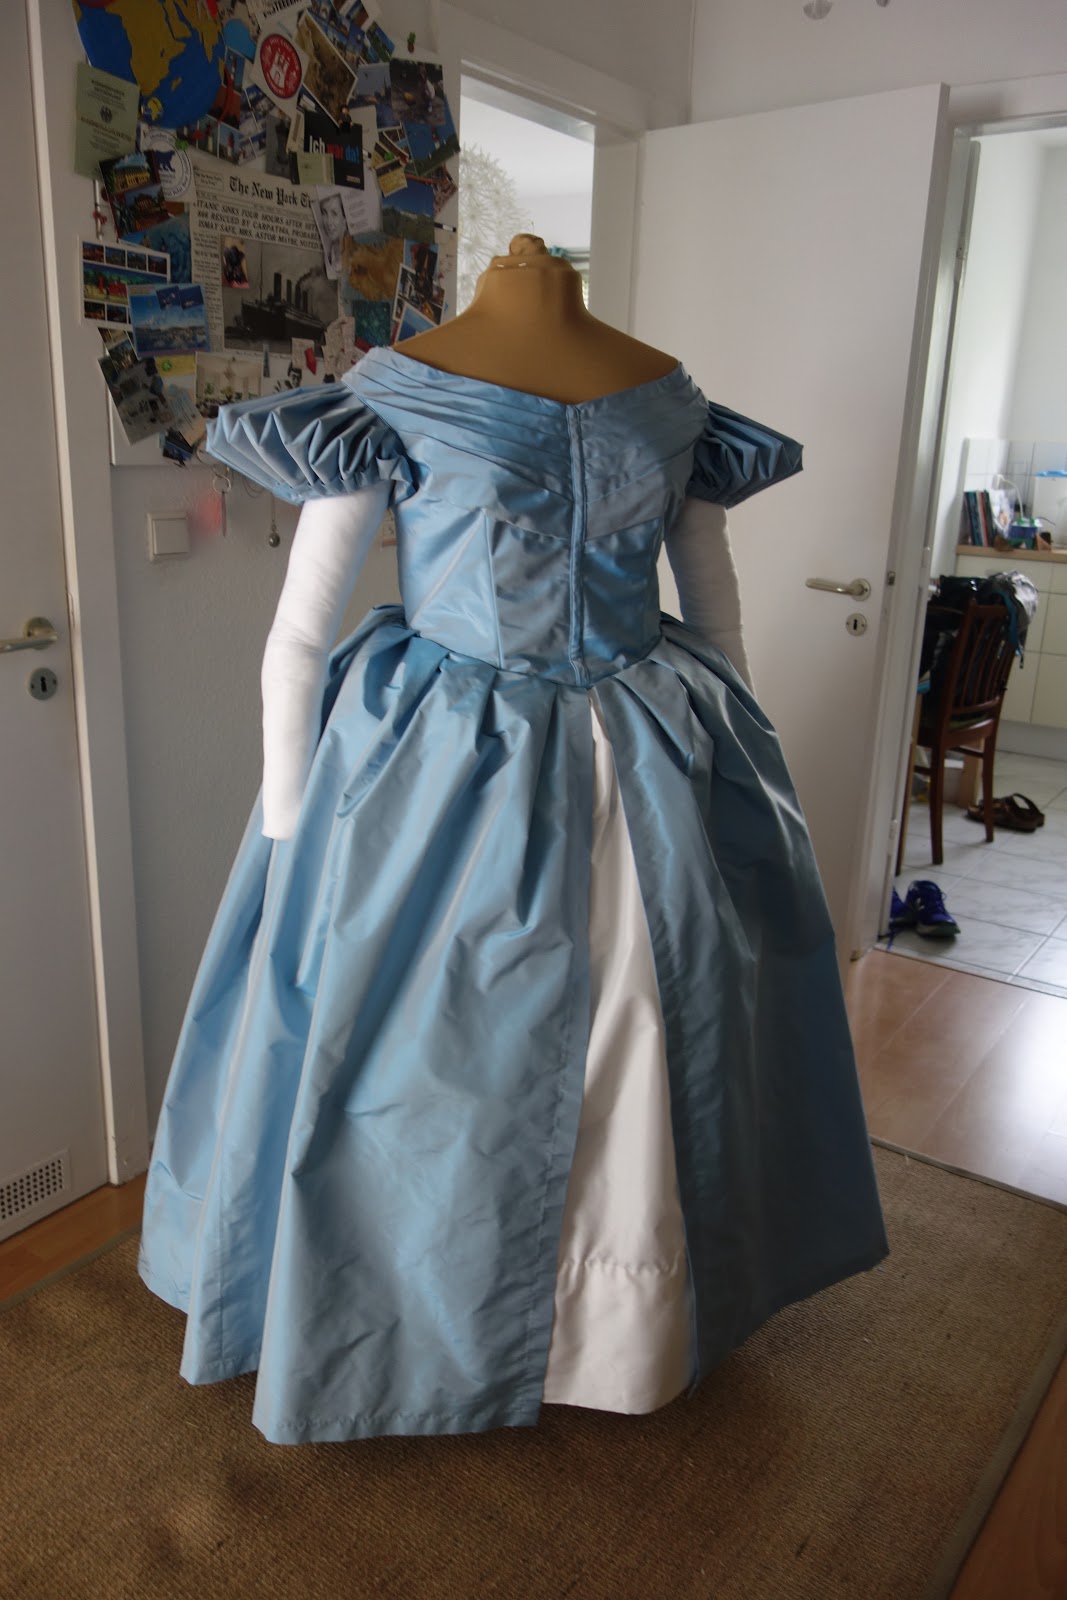
The skirt just pinned on.


Next up: Bows!
Lots of bows!
I watched some tutorials on youtube and settled on a version using a cardboard piece to get them all the same size.
 |
| Bows before pressing and turning |
 |
| Bows after pressing and turning |
 |
| The Bow-Tool |


Finally I got to attach the bows and basically finish my dress. Unfortunately it is not really visible, but the ivory underskirt has an all around trimming as well...


Needless to say, that I am super proud of this dress!
 |
| Wearing my Gala Dress for the first time at home... |
 |
| Testing the hairdo |
 |
| I fixed the feathers to my hairdo by sewing on wigclips. |
The gloves are vintage from ebay (with buttons at the wrist! I love them!)
The fan is a cotton lace one I bought at the market place the day before the gala...

The shoes were another challenge... If American Duchess would still sell Bronte Slippers, I would have bought them, but they have been discontinued for a while. So I searched the intenet for white slippers with square toe boxes and came up with these (after looking at roughly 4000 pairs - no kidding):
 |
| I removed the trimmings and covered the stains with lots of white leather colour. |
 |
| I made two different shoe clips to cover the holes from removing the old trimmings. |
 |
| I also added elastics for an authentic look (and a good fit to the foot) |
All done!
Before I shower you with more photos (I will!) let me sum up this project in numbers:
Dress
Material:
12m of blue silk taffeta, 7m of ivory silk taffeta , 2m cotton twill, 2m buckram, 2m cotton muslin
Pattern: TV 455 with MANY adjustments. sleeves selfdrafted.
Year: mid 1830s
Notions: Cotton thread, linen thread, cotton yarn for cording, cotton tape, silk thread, German plastic boning, hooks and eyelets.
Accuracy: Pattern and materials are good, ALL HANDSEWN!!!
Hours to complete: About 150 hours.
First worn: Costume College Gala 2018
Total cost: Roughly 600€ Never before have I spend an amount like this for a selfmade dress...
Corset/ Petticoats
Material:
2m ivory silk taffeta, one old tablecloth, 8m cotton organdy for three petticoats.
Pattern: Rectangles for the petticoats, corset selfdrafted.Year: mid 1830s
Notions: Cotton thread, cotton yarn for cording, silk thread, German plastic boning, metal grommets, elastic for the waistbands, a hook for the corset, spilt busk, steel for the hoop.
Accuracy: Good enough for myself... the corsetbusk is not accurate, nor are the elastic waistbands or steel in the hoop. Mostly machinesewn.
Hours to complete: About 50 hours.
First worn: Costume College Gala 2018
Total cost: Roughly 100€
Accessoires:
Hours to complete: Roughly 20. The hairpiece took a while...
Total cost: Shoes, Gloves, Jewellery, Hairpieces, feathers, stockings and fan sum up to roughly 150€.
In summary:
220 worked hours
850€ Material cost
Oh my. I am only just realizing what a fortune I spent on this project... It actually hurts a little. It summed up bit by bit without me even noticing in my insanity sewing mood.
WORTH IT!
And finally: The dress worn at Costume College Gala Night!


 |
| I know this picture was in my last post, but it is the only one I have where you can actually see the shoes! |


 |
| Rebecca and I at the Gala |
 |
| Photo by Amanda Le Blanc |

What an experience! I learned so much on the way!
Originally I planned to make this post the week after Costume College, but life just happened...
I didn't even sew until two weeks ago (a petticoat) since CoCo.
What do you think? Was this write-up too long? Too many pictures? Please give me some feedback on it!
A very merry christmas time to you all!

AHHH I'm so glad I got to see this in person. This gown is even more gorgeous in person. I'm still in awe that you hand sewed the entire thing. You are amazing. Your work is impeccable.
AntwortenLöschen-Rachel
Thank you so much Rachel! I pulled it out yesterday for this write-up and it made me so happy!
LöschenWow, wow, wow! Unglaublich toll!
AntwortenLöschenDankeschön!
LöschenI remember reading this awhile back but realized I hadn't commented on it. But reading it again reminded me of how beautiful I thought your dress was and I wanted to keep touching it and seeing closely all the details. The time you spent making it is amazing, and the finished dress showed how much work you did put into it. Brave on accomplishing those sleeves!
AntwortenLöschenVal
I am again reading your blog, just because I remembered your dress after seeing all the pretty plaid ones that showed up at Costume College 2019. This time I caught your tip about sewing a wig clip to your feathers to attach it to your hair. I wished I had remembered that because mine kept falling out. On the Red Carpet, no less!
AntwortenLöschenI'm working on a couple 1890s dresses right now, and later will start on some 1914 dresses. But I have fabrics for 1830s when I'm ready!
Val
Hallo! Ich bin versehentlich auf Ihren Blog gestoßen und war froh, dass es so wundervolle Menschen im Ausland gibt! Vielen Dank für all Ihre Shows und diese sorgfältige Arbeit! Ich komme aus dem fernen Moskau und mache auch historische Kostüme. Wenn Sie möchten, besuchen Sie mich auf dem Blog: https://lebedinajpesnja1.blogspot.com
AntwortenLöschen