Pages

Mittwoch, 21. September 2016

Der Faullenzer

Hello friends!

Today is the day I created the biggest mess ever in my sewing room.
Don't ever cut open a down duvet!! Feathers everywhere!

I am not sure why, but I obviously avoided blogging lately. I just couldn't bring myself to write anything. So naturally I do have a lot of catching up to do, because I certainly did not avoid sewing.

Aside from the feather incident my latest project was a corset I've been longing to recreate:

http://digital.ub.uni-duesseldorf.de/ihd/periodical/pageview/3088267
Faullenzer; Der Bazar No 27, 10. Juli 1893
A morning corset the description calls a "Faullenzer". I actually laughed when I read this. It is german for slacker. I am not sure, if this is the correct translation. If you know the correct word please leave a comment so I can correct it.
Modern german would actually skip one L and call it Faulenzer... It is a corset for negligé wear, without clasps or lacing, but instead a belt which laps at the back and ties at the front.

The reason I liked this corset so much is the super simple belt fastening instead of lacing.  I took the pattern off the original pattern sheet from my Laptop screen, since I don't have a printer and wasn't patient enough to wait for a commercial pattern to arrive at my doorstep.

No kidding:


After taking the pattern I enlarged it with my 1930s Frohne tool and make a mock up.

The original pattern is super short waisted so I made some adjustments and also shortened the bust gussets.


As you can see on the pattern sheet the front piece indicated a dart to shape the fabric to the body. This dart was supposed to go from the tip of the outer bust gusset to the bottom between the busk and the first hip gusset. I made this dart in my mock up and then decided to actually make two frontpieces. This way the bulk under the breast is reduced and the seam is super strudy. Also the insertion of the bust gusset is easier. The seamlines are exactly the same as the original ones.

Pattern- Der Bazar No 27, 10. Juli 1893


The sewing instructions given with the pattern are as follows:
Für dieses lose und doch dem Körper Halt gebende Korsett schneidet man aus Drell nach Fig. 78-83 und 85 je zwei, nach Fig. 84 einen Teil (Der Stoff für die Nähte ist ugegeben), verbindet die Teile miteinander, wobei jedoch am rechten hinteren angesetzten Teil von Stern bis Stern ein Schlitz frei bleibt, führt je die vorgezeichnete Falte aus und steppt dem Korsett auf der Außenseite längs der vorderen Naht, sowie je am hinteren Rande für Stahlstangen und Fischbeine Stoffstreifen auf. Hat man den übrigen Teilen, den Vorzeichnungen folgend, Bänder für die Fischbeine untergesteppt, so näht man die Gurtteile von 61 bis 62 an der linken Seite der Fig. 84, an der rechten Seite der Fig. 82 gegen, fasst das Korsett mit Band ein, verziert es mit einem bestickten Börtchen, bringt an den äußeren Seiten der Gurtteile Bänder an und schließt das Korsett, indem der linke hintere Gurtteil durch den Schlitz geleitet und die Bänder vorn zusammengebunden werden.

Roughly translated...
This loose but supproting corset is cut from drill, pieces 78-83 twice, piece 85 once. Connect all pieces but leave a slit between the stars, sew the dart as indicated and add strips of fabric at centre front and back on the outside for steels and fishbone and add all other strips as indicated. After this is done add the belt to piece 84, bind the corset and embellish it with embroidered lace, add laces to the belt and tie it at the front by bringing the left belt through the slit .
 The pattern actually pointed out where to use steels and baleen...

I made my corset from the same materials as my 1876 corset. Cotton drill, satin binding, twill tape, silk flossing and bobbin lace as trimming. Steel was used where indicated on the pattern. All other boning is german fishbone.
 The gussets are reinforced with buttonhole stitch in silk thread. I used Black Gold Needles from Clover and broke the first one after two stitches! Needless to say I was super annoyed. Not just because the needle broke, but because they were really expensive as well...


Lace pinned on
all finished:-)

1893 Morning Corset - Front

1893 Morning Corset - Side

1893 Morning Corset - Back


1893 Morning Corset

1893 Morning Corset


 Although it is a corset, it really isn't possible to "lace" it super tight. If you do the steels at the centre back will start to bend, since they're only pulled from the middle. This way there will be no even lacing gap and the "Faullenzer Feeling" will be gone.

Now that I made this morning corset I am planning to sew a morning gown to go with it. With enormous 1890s sleeves, of course!


See you soon!

Dienstag, 10. Mai 2016

Costume craziness...


How do you guys choose your next sewing project?

For the next event?
Because you always wanted *that* dress?
Or because you just like to sew a challenging project?

And how did you choose that exact dress? Was it instant love?

Or are you more like me, seeing 1890s sleeves and think "ugh... No Way".

Day Dress c. 1895
10 month later you see the same sleeves and think "I want those NOW!!"

In my entire life I have never been to a real costuming event. My choice of sewing project usually comes from my brain saying "I like this. Let's make it". When friends and family ask what I am making all this "stuff you'll never wear" for, I have no satisfaying answer for them. (At least not what they expect to hear)

I sew, because I am fascinated by historical fashions!
I sew, because I can see and feel the direct results of my hard work right after finishing a project. That is a very rewarding feeling!
I sew, because it makes me happy!

Do you know this feeling of instant happiness when you open the doors of the wardrobe?
With sewing I found my peronal way on the road to happiness and right now I just want to go foreward and find more of it!

 Last week I spend a week of vacation at home. Since I catched cold I didn't really enjoy it, but still managed to do some ebay online shopping. For my costuming hobby, of course...

I ordered a bunch of old umbrellas and parasols for peanuts and intend to recover some of them. They arrived last saturday; so at the very end of my free time.
Why is it, that my costuming spirits rise on the last day off work every single time I am off? It's like my brain does not realize, that it will be back to "real" work the next day.

Here is where the costume craziness starts...

My step by step brainstorm towards my next sewing project(s)

On saturday bespoke umbrellas and parasols arrived. This bunch...


- Two walking sticks went back into the box to get tossed
- One super heavy old crab went to the box as well - a broken spoke I couldn't fix
- The red one gets tossed, too. Unfortunately beyond saving
- Two umbrellas are in fairly good condition and don't need much fixing to be reused
- Three are good to get a new cover and I already removed the fabric

Sunday
My first project is to recover the former beige one and the plan was to use white cotton combined with florentine net lace.

I cut our the matching pattern piece from Truly Victorian TV570 Parasol Covers and soon realized, that I don't have enough lace to do the job.
The fabric is missing 40cm.
So I went back to ebay to search for new fabric for this parasol.

And fabric I found!
Only not for the parasol... 10m of black silk taffeta! I couldn't resist. A total bargain! What to make from it??? (notice how my parasol project is beeing pushed aside to dream of some hypothetical dress?)

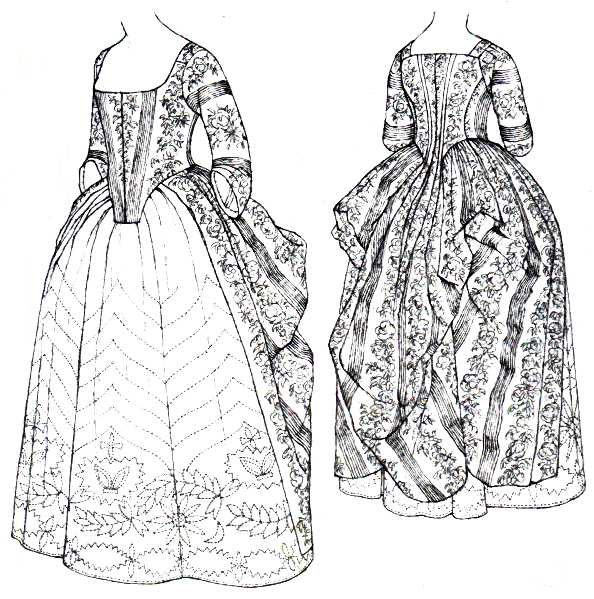
Got it! I desperately need a Robe a L'Anglaise. Don't I?
Like this one

And it has to be all black so I can use it for choir concerts. 10metres are enough. Perfect! I even have a pattern flying around.

OR I could make a cute Polonaise...
Louis Carrogis, Madame la Comtesse de Vauban (1776).

I absolutely LOVE this painting. The pink silk for the Polonaise has been in my stash for two years already. Time to use it!


Wait a minute, didn't I plan on making a handquilted petticoat lately? like this one?
Aaaw! 1770-80 Polonaise, Illustrated in Patterns of Fashion 1

It would have to be super accurate, of course. Silk satin, wool batting, woolen backing. Where do I get wool batting?
Back to ebay!
And sure enough there is a supplier not too far away from home from happy sheep! Hurra!
Aaaw, all those pretty quilted petticoats!

"Off to bed and dream of petticoats" was my next thought on sunday evening and I took Nancy Bradfield's "Costume in detail" for good night inspiration. I remembered some quilts in there...

After some woolgathering I continued to browse a little more for good measure...
And found this:
Costume in Detail p. 56
Hold on! Didn't I toss this very umbrella a few hours ago????
It is half past midnight already, but out of bed it is!
Remember the super heavy old crab umbrella? Now that I see this drawing I am stunned of the similarity to my version. I directly pulled it out of the box to have a closer look:

Nearly all measurements are the same and the spokes are whalebone!!! Real baleen in my home! The possibilities! OMG!
The only major difference is, that my umbrella has 8 instead of 9 spokes...

This thing must be really old since baleen has been used for umbrellas between 1750 and 1850. The cover is not original; it is machine sewn. But still fascinating...
Details of the nearly tossed treasure (Baleen!!!)


One spoke is broken. Hard to believe actually - that stuff is really strong.


I want to boil the spokes and make stays of it!!! Hurra!

But can I really destroy this witness of fashion? Imagine the pretty dresses this umbrella saved from rain (hold by a gentleman, of course).

What would you do?

Next time:
Really happening projects:-)

Montag, 29. Februar 2016

Pleat the pleats!

Friends, I'm back!

I spend a lovely vacation in Norway in January and since I am back home my sewing room has been buzzing with energy!

Just in time for this month HSF Theme "Tucks and Pleats" I finished a ballgown bodice I am truly proud of...


You know I don't need a specific reason to sew something and it is not different with this new item. I don't have a ball to attend and I don't even dance.
BUT
I just love ballgowns! So I started to make a big one just because I wanted to.

As soon as I arrived back home after my vacation I ordered a ton of new sewing patterns and supplies and started without a real plan on the outcome of my new dress. All I knew was, that I wanted a hoop and a pointed basque on the bodice.

My bodice started out as Truly Victorian TV442, but I altered it a lot during the fitting process.


Three mock-ups were necessary to make me happy with the fit. To make fitting easier on myself I cut the centre back panel on fold and sewed in a zipper at the centre front for easy access.

I lowered the neckline and altered the sleeves, hem and bertha as well.


The flatlining is a rather soft cotton twill and as soon as I finished the first seam I decided not to line the bodice, but to finish the seam allowances nicely and leave it that way. This was actually quite commonly done in the 1860s.


binding the seam allowances
a first guess on the gown


Hooray! It looks like a real dress!
A ton of handstiched eyelets later I tried it on and got all excited about my new dress!
I started to sew the skirt parralel to the bodice and right after the first "real" fitting I thought that it would be nice to pipe the whole thing.
So I did...
piping the lower edge of the bodice
Then it was time for the bertha. I actually had a bunny called Bertha a few years back and although my rabbit has nothing to do with the bertha of my bodice I couldn't stop thinking about it...

The bertha for my ballgown bodice is sewn from self fabric bias strips on a cotton base to achieve the pleated look I like so much on period ballgown bodices. This technique is actually period, too and has been mentioned in the construction deails for a 1845 day dress in Janet Arnolds "Patterns of Fashion 1". Sure my dress is meant to be set in the 1860s, but I did it anyway.

Bertha in progress

finishing bertha

Bertha!
The other bertha


I put it on the dress form again and got REALLY excited! I mean look at those pleats! I am in love with them!!

pleated bertha front
pleated bertha back


Since I didn't want to split the bertha at the centre back seam, I made up the back panel in one piece and stitched it to the front on the right shoulder. The bertha is then pinned to the left shoulder afer lacing up the back.

The next hour was spent admiring my hard work...


After my drooling break I tried some trimming possibilities...


Lace...
Bows...


Bow at the centre front...
Bow with lace...


The finishing line in sight I basted the lace to the bertha and finished the last raw edges (on the sleeve lining) with bias strips.
And then I was all done with the bodice!!! Hooray!!

1860s ballgown bodice inside view

back point detail
lacing eyelets


The skirt is not 100% finished yet. I actually made it a tad too big and have to redo the waistband and face the hem. And probably trim it with pleats...

Anyway, this skirt holds my very first attempt on cartrige pleating ever!


To prepare the pleats I marked the lining with chalk.


Tadaaa!

And finally, for the first time in months:

The HSF challenge details!

A 1860s ballgown bodice

The Challenge: #2 Tucks and Pleats

Material: 3 metres of polyester taffeta, 1.5m cotton twill

Pattern: TV442 with many alterations

Year: 1860s
Notions: 6m piping cord, heavy duty zip ties and spiral steel for the boning of the bodice, 4m black lace, hooks and eyes
How historically accurate is it? Well... the pattern is ok, but the trimmings are not as elaborate, as they would have been in the 1860s. My fabric is not accurate at all! Let's say 60%.
Hours to complete: I am guessing on 40 hours
First worn: Not yet and I have no idea when I will get the chance to...
Total cost: 50€ for the fabrics. Everything else was in my stash and I am guessing on 100€ in total.

And now:

more pictures!!


The back bertha is getting pinned underneath the front part on the left shoulder. I must admit, that it is very difficult to do that all by myself when dressing...


Pleats!!
Not really visible, but there is piping around the sleeves as well...


The bows are only pinned to the bertha. In the end I didn't like them as much as I thought. They are so big, don't you think?


The lacing will be black or blue eventually, but white was the only option I had in my stash...


I seriously can not get enough of those pleats!!!


And finally, since I can't really resist:
The beautiful northern lights I saw in Norway! That was the most beautiful thing I have ever seen in my entire life!!!

 
 See you soon!
fashion plate