It also tends to be the time to make the most unrealistic sewing plans...
Back in December I was looking at 1 week of vacation (the week before christmas) and two choir concerts ahead (less than a week to go for Bachs Chritsmas Oratio and about two weeks to go for Beethoves 9th Sinphony). I decided to give up un my dream of a super spontanious 18th century dress-up in Hamburgs Elbphilharmonie for Bach and instaed to focus on my possibilities for Beethoven.
My crazy choir plan is to sew a dress coordinated to the time period of the works we sing.
The only down side is that everything has to be black...
Of course I'd love to do that for every concert, but for the last couple of years that was just a silly dream of combining my two passions.
So with two weeks ahead (one off work) it seemed to be a good idea to start a new and ambitious project. Because it is totally realistic to make an outfit inside-out in two weeks, right?
So I set out to find a reasonably simple, but beautiful 1820s dress to make in two weeks with only one tiny problem: I have never made anything 1820s before and am therefore lacking the proper underwear...
Beethovens 9th Sinphony was first released in 1824 an my intention was to at least find an original close to 1824.
My choice fell on this dress from The Met Museum which dated to about 1825.
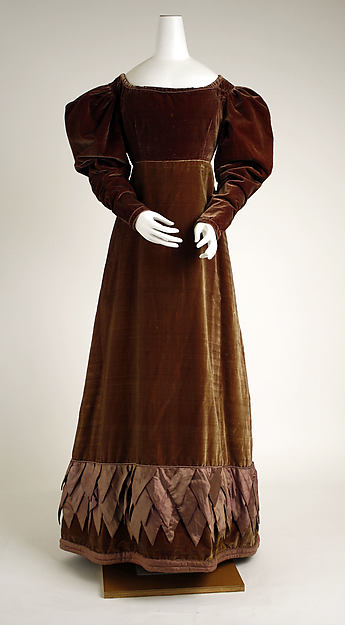 |
| metmuseum 13.49.21 |
Before even thinking of the proper corset to wear underneath I ordered some black velvet online and startet on a mock up. A pattern is provided in "Masterpieces of Women's Costume of the 18th and 19th Centuries" and I used it as a guide.
The first mock-up was soon finished and needed fitting.
But there was no corset to be seen around...
At this point I realised I could not go on without the corset/ stays. I decided on a model from Corsets and Crinolines (p. 76) and digged out the pattern I made for my short stays years ago.
This Corset was on my wishlist forever and left me with two choices:
1. Make a simple version without the elaborate cording and focus on finishing the dress and then most likely never again attempt this project, because I already have this corset fittet, or
2. Make my historical sewing dream come true and attempt to make a close copy of an original corset in the V&A Museum.
 |
| V&A T.57-1948 |
This would make my chances of finishing the dress in time for the concert very little. But I love a challenge and so I set out to attempt a reproduction of this corded monster!
The pattern in C&C is based on this original from the Manchester Art gallery
The pattern seems to be the same as the V&A corset, however the cording and quilting pattern is slightly different.
The rest of that day was spent searching the internet for every available image and details of the original and making a sample of the cording.
A huge help was the cording tutorial Christina made on her blog The Laced Angel back in 2014.
In the end I used a different method, but her tutorial helped a lot to encourage me to actually attemt this (massive) cording challenge.
 |
| Left a sample from 2014 - because I directly tested Christinas tutorial. Right todays sample. |
I sewed this corset on my hand crank machine to have full control over every stitch.
Also I made every stitch from the left side! I adjusted the tension so the looks on the right side would be nice and even, but there was nooo way I would mark my pretty fabric with whatever pencil or chalk or pen.
I started with the two back pieces. The cording is fairly easily done, since there are only straight tunnels. I did not use a needle to pull the threads through. Using a needle takes forever and is risky for the fabric. Since neither the time, nor the patience was on hand I used a super thin wire pulled from wired ribbon.


The part that actually scared me a little was sewing and than cording the tiny tiny squares on both sides and the front piece...
The sewing part was exhausting! One million tiny squares!
OK, roughly 900 full squares and a lot more half and quarter squares...
One square means exactly 16 stitches an lifting the pressure foot 3 times. It not only took forever, it actually hurt my fingers after a while from lifting the pressure foot. It was also the first time I actually had sore muscles after 5 days of all-day-sewing (did I mention I was sewing on the hand crank machine?).
The only soothing and hypnotizing part was watching the rewinding of the bobbin...
I made a little video to soothe your tired eyes througt this super long and not even close to finished blog post:
Actually I made some more (cording) videos which I cannot upload right now, because they are too long... Maybe I'll add them later.
I did not mark every square. After my start in a corner I would go in a 45° angle and just mark the width of a cording tunnel after each row with a trickmarker. the space between the squares was roughly eyeballed.


While the sides had a fairly easy cording pattern the front piece was a lot more elaborate. To trace the pattern to the lining I poked holes througt the pattern with a pencil and used the resulting dots as sewing guide.


First step on the fron piece was to sew long cording tunnels before filling with straight tunnels and more tiny squares. I also made an exception by adding the little leaf embroidery on my modern machine and from the right side of the fabric.


A few more fillings...


Almost there...

The tricky "squares in a curve" were the only ones marked on the lining.


Phew...


Next: inserting the bust and hip gussets


After finishing all the necessary tunnels and squares I started cording the long channels beside the busk and boning channels. The round parts were no problem at all with my wire-cording method.


 |
| a little test on the dressform |
Then I corded the side pieces...


And finally the front...
 |
 |
| left side before knotting off all the loose ends. |
 |
| And after knotting everything off. I also put a little fraycheck on most knots. |
At this part I was just relieved that the scary part was over and all pieces looked just beautiful in my eyes!

Next: sewing all eyelets and inserting the boning, joining back, sides and front and add the shoulder straps.
And FINALLY I took a first look at my newest corset!
 |
| left side |
 |
| Right side |
The lining is made from the same cotton than the interlining. As last step I bound both top and bottom edge with self-fabric bias strips.
 |
 |
| My finished Corset - front |
 |
| My finished corset - lining |
 The busk is made from leftovers of wooden blinds. I cut three strips of the desired length and glued them together, put lots of books on top and left it overnight to dry.
To fix it to the corset I drilled two little holes and finally sanded all edges for a smooth finish.
Of course this is not historically accurate at all, but I needed a substitute...
Bonus: it is white

DONE!!


I must admit I did not finish for the concert. I made it wearable, but without lining and binding. That part was done last week (guess what - on vacation at home).
My 1820s dress was wearable in time too, but without the trimmings. In the end I wore something else (same outfit as to the Christmas Oratio) and unfortunately the dress is currently sitting on top of the UFO pile...
After months of missing HSM challenge after challenge this item fits into februarys "under" theme:
A corded corset
Material: Cotton satin, cotton tablecloth for lining and interlining
Pattern: Corsets and Crinolines p. 76, cording pattern V&A T.57-1948
Year: 1820s
Notions: Cotton thread, cotton yarn for cording, cotton tape, Busk made from old wooden blinds, German plastic boning
Accuracy: Pattern and materials are good, the eyelets are worked, but most of it was sewn on my old crank handle machine
Hours to complete: About 90
First worn: Not yet since just finished
Total cost: 10€ for the satin, 6€ for the cording yarn, 5€ for the tape. Everything else from my stash

Unglaublich wie viel Arbeit so eine Schnürbrust macht. Aber es hat sich echt gelohnt! Wunderschön!
AntwortenLöschenVielen Dank! Es hat wirklich etwas Überwindung gekostet dieses Projekt anzugehen.
LöschenThese are absolutely amazing! I still haven't finished mine, but now I want to go back and complete them.
AntwortenLöschenThank you! Your work is such an inspiration!
LöschenThis is a fabulous entry! The sheer perseverance is impressive and inspirational. And with such beautiful results!
AntwortenLöschenThank you!
LöschenSuperb. Very impressive.
AntwortenLöschenThank you!
Löschen