Pages

Samstag, 21. Dezember 2013

New corset


I have been sewing again!!!

My new project was an underbust corset. I have never seen an underbust corset in the 1880s, but I liked the shape and flexibility so much that I simply cut off a 1883 corset pattern from Frances Grimble's "Fashions of the gilded Age Vol. 1"
The material used is jean from my stash and some lace from ebay. For the flossing I used polyester thread. This corset is certainly not my first corset, but it is the first one ever to be finished with flossing. I have started another one using the same fabric with silk flossing some time ago, but I am afraid it went to the UFO pile...
I plan on completing that one for HSF challenge #4 - 2014.

Anyway, here is the evidence following up on last week:

setting in the hip gusset
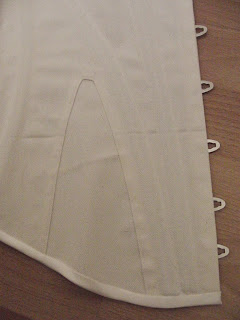
finished hip gusset


Since the corset has just one layer I used twill tape for the boning channels on the inside. This tape is wide enough for two rows of 5mm spiral-steel boning.


preparing the busk


 The joining parts are going to be a boning channel as well so I was extra careful to keep it wide enough. The jean is really firm and at some stage it was quite difficult to turn under the seam allowances, but I am happy with the outcome after all.
 To insert the grommets I used this hole punch. The nobs of the busk where pushed through the fabric, but for the grommets I cut the holes before I inserted them.
 And here it is: my new underbust corset.


Flossing is quite new to me, so I prepared this panel to practise flossing before actually stitching on the corset.

The orange part is from the UFO earlier mentioned...

I only flossed the bottom parts of the boning channels so the red threat won't show under the cream coloured lace.


Flossing inside                                                                   Flossing outside


Front view with the lace pinned on the top binding to see how it works with the busk...


  First side finished!!!!

                                                                      Tadaaaaa!!!!


 And here are more pictures....


I love this new corset, but I am not sure if this will go for challenge #26 - celebrate so I won't be posting anything on that challenge now. Maybe next week....


And because I can not resist: a glimpse into my sewing room


Sonntag, 15. Dezember 2013

New old pattern

A couple of days ago I was fortunate enough to win an auction on ebay. Yesterday my new pattern arrived: it is an original 1875 pattern sheet from the french magazine "Journal des Dames et des Demoiselles" containing 6 patterns. I don't speak french but this is what I got:


1. Toilette de courses

I guess it is supposed to be a dress for the racetrack...


2. Casaque pour petite fille de 7 ans

3. Parure en guipure.
- no picture for this one and I have absolutely no idea what it could be...


4. Toilette de promenade


5. Confection d'été pour toilette de ville

6. Chapeau à fond mou
- no clue or picture again


My sister will visit over christmas and she speaks french. Maybe she can help me figure out the text on the pattern.

It is one sheet printed on both sides.


Samstag, 7. Dezember 2013

My first hat!!!

It is finally done! I have finished my first hat ever!!!
And I really like the result.
I managed to stay within the one metre allowance as well. Here are my "hat calculation" and the challenge details:

The Challenge: # 25: One Metre

Fabric: Muslin for the mulling, cotton satin as fashion fabric, taffetta and chiffon for the trimming. Calculating with a fabric width of 1,5 metres (the cotton satin) I used exactly 0,96 metres of fabric. Phew...

In detail:
Hat
0,24m muslin for the mulling
0,3m cotton satin
0,05m taffetta for the lining

Trimming
0,1m cotton satin
0,15m taffetta
0,12m chiffon

Pattern: Lynn McMasters Bustle Era Gat Pattern, view B

Year: 1870 - 1880s

Notions: Buckram, Millinery wire,Gardening wire, Nylbond, Polyester thread, Glue.

How historically accurate is it?  The pattern is accurate and the trimmings are as well, but the taffetta and chiffon are polyester fabrics. For some parts I have used my sewing machine. I give myself generous 80%.

Hours to complete: about 20 hours.

First worn: I am so in love with this hat, I am wearing it as I write this. I simply cannot take it off...

Total cost: 15€ for buckram and millinery wire. Everything else is from the stash.

Pictures!!!!


For the bows on the back I used gardening wire to fix together three rectangle parts of both cotton satin and taffetta. I covered the joining part with fabric to conceal the wire before attaching the bow to the brim.
 Here we go...


front view

side view

back view. I could stare at this for hours!


 Inside view. Here you can see the stitches on the inside of the bandeau where I attached some of the trimmings.


 A detail of the backside trimming. I didn't cover the fuzzy part on the brim in the end. In fact, I am starting to like it :-)

From top to bottom:

bow of satin and taffetta
loops of chiffon
brim
loops of chiffon
bow of satin and taffetta
"something" from taffetta (not visible in this picture)
another satin monster bow.


I LOVE IT!


Freitag, 29. November 2013

Loops & Bows

Not long now and I will wear my very firs hat! I finally attached some trimmings to the brim. I'm having an enormous bow on my forehead and lots of loops on the sides, but I am not quite sure what to do with the back.
But before I started with the trimming I fixed the bandeau inside the hat. It is supposed to shape the hat and keep it in the right angle. The stitches run through the brim at four spots.


 To prepare the first bow I didn't pin, but used magnets to fix the fabric. This way I avoid those tiny marks on the fabric. It is the front decoration after all...
 ... and it looks ridiculous! I didn't keep in mind that the fabric would shape around the crown. The small part of the bow is way to long. But since the ends of the taffetta were already finished I decided I would have three bows instaed of two. The big one in the same fabric like the hat (cotton satin) and the small ones from a slightly darker taffetta.


Here is my finished monster bow!


 For the loops I used the same fabrics as for the bows. To prepare them I made some ribbons as seen on the right.
After pressing I turned the inside out and formed the loops using thin wire. Unfortunately this took more fabric than I thought. Now I have to be very canny with my fabric to stay inside the one metre allowance... To make some space in my calculation I decided to not include the buckram. It is no real fabric, is it?
 Before I actually started sewing on the loops I used my magnets again to run a test where to place them.

The beginning of my row of loops was rather messy so I covered it with fabric. It will be covered by the bow as well, but it should be neat anyway...

This is the front of the hat. The loops leaving a gap for the bow.

I am very pleased with the result and cannot wait until my hat is finished! The backside is still quite empty, but I will think of something nice within the limits for this challenge.

Here are some pictures:


 Side brim with loops...
 ... backside without trimming...


... and the front view. For these last pictures I used the flash light on my camera, so you can see the "real" colour of the fabrics.

Does anyone know how this is to be fixed to my head???